Brewing Methods
How to Make Pour-Over Coffee at Home
A practical guide to pour-over coffee at home: gear, grind size, water temp, and technique for a clean, clear cup every time.
Pour-over coffee is ground coffee in a filter, hot water poured slowly over it, gravity doing the rest. The cup is clean, bright, and tends to show off single-origin beans better than almost any other method. You can get there in about five minutes once you know the steps.
What You Actually Need
You don't need much, but a few things matter.
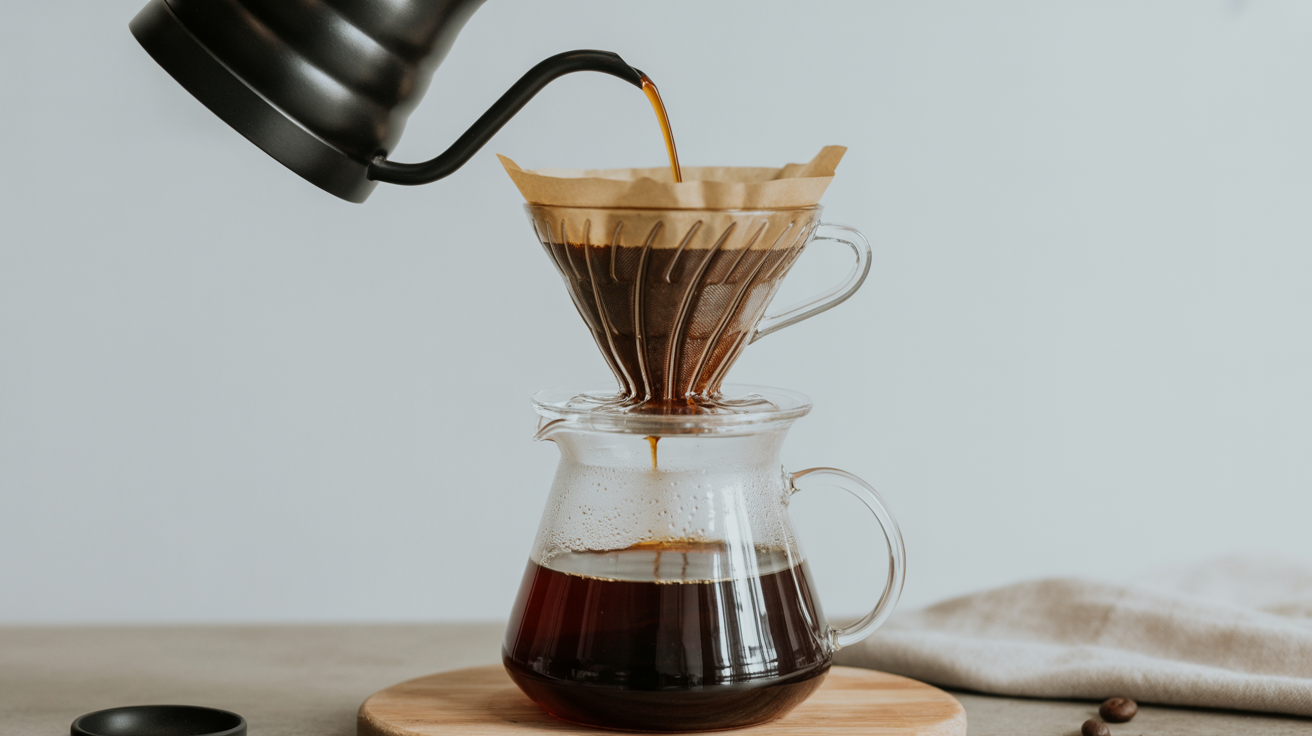
Brewer. The Hario V60 is the most common starting point and the one most online guides use. A Kalita Wave is more forgiving if you're still dialing in your pour. Either works. Choose based on what's available locally or what fits your budget.
Filters. Paper filters for most home use. Rinse them before brewing (more on that below). Cloth or metal filters are options, but they let more oils through and produce a heavier cup.
Kettle. A gooseneck kettle gives you real control over where the water lands. A regular kettle works, but it's harder to pour slowly and accurately. If you brew pour-over more than a few times a week, a gooseneck is worth it.
Grinder. A burr grinder makes a real difference. Blade grinders produce uneven particle sizes, which means some coffee extracts too fast and some too slow in the same brew. The Timemore C2 and Hario Mini are decent hand grinders under $50.
Scale. Optional but helpful. Eyeballing water volume gets inconsistent. Even a basic kitchen scale removes one variable from the process.
Ratios and Water Temperature
The standard starting ratio for pour-over is 1:16 (coffee to water by weight). For a single 300 ml cup, that's about 19 g of coffee and 300 g of water.
| Cup size | Coffee | Water |
|---|---|---|
| Small (250 ml) | 16 g | 250 g |
| Standard (300 ml) | 19 g | 300 g |
| Large (400 ml) | 25 g | 400 g |
Water temperature: 195–205°F (90–96°C). Boiling water is 212°F; if you don't have a thermometer, let the kettle sit off the heat for 30–45 seconds after boiling and you'll land in the right range. Lighter roasts extract better at the higher end. Darker roasts tend to go bitter at 205°F, so pulling back to 195°F helps.
Grind size for pour-over is medium-fine, similar to table salt. Too coarse and the water flows through fast, leaving the cup thin and sour. Too fine and water backs up, extraction runs long, and bitterness creeps in. If your cup tastes sour, grind finer. If it tastes bitter, go coarser. For more on how ratio affects every brew method, see our guide to coffee-to-water ratios.
Step-by-Step Pour Technique
Once you have your gear and ratios sorted, the process is straightforward.
1. Rinse the filter
Place the filter in the brewer, set it over your cup or server, and pour hot water through it. This removes the papery taste and warms the vessel. Dump that water before you start brewing.
2. Add coffee and tare the scale
Put your ground coffee in the rinsed filter. Give it a gentle shake to level the bed. Place the whole setup on your scale and zero it out.
3. Bloom
Pour 2–3x the coffee weight in water to start. For 19 g of coffee, that's 40–55 g of water. Pour it slowly over the grounds, making sure everything gets wet. Then wait 30–45 seconds.
This is called the bloom. CO2 trapped in freshly roasted beans releases during this pause, which lets water reach the coffee more evenly in the next pours. Beans roasted within the past two weeks bloom noticeably, with a dome of grounds puffing up. Older coffee barely moves.
4. Pour in stages
After the bloom, pour in slow, steady circles from the center outward, then back in. You're not trying to stir or agitate the grounds much, just keep water moving evenly over the bed.
A common approach for a 300 g brew:
- 0:00–0:10: Bloom pour (50 g)
- 0:45–1:00: Second pour to 150 g total
- 1:30–1:45: Third pour to 230 g total
- 2:00–2:15: Final pour to 300 g total
Total draw-down (when all water has dripped through) should finish around 3:00–3:30. If it finishes in 2 minutes, the grind is too coarse. If you're still waiting at 4:30, it's too fine.
5. Taste and adjust
The cup is ready when the last drop falls. There's no need to wait. Taste it while it's hot, then again a minute or two later as it cools. Flavor often opens up as temperature drops, which is one reason pour-over coffee tends to be worth drinking all the way to the bottom of the cup.
Dialing In Your Grind
Most pour-over problems come back to grind size, and this is where a cheap hand burr grinder earns its keep.
If the cup is sour or thin: water moved through too fast. Grind finer, or slow your pour.
If the cup is bitter or astringent: extraction went too long. Grind coarser, or pour faster. Also check your water temperature, especially with dark roasts.
If the cup tastes flat with no clarity: the coffee may be too old. Beans past six weeks from roast date lose most of their soluble flavor compounds. Fresher beans are a bigger upgrade than any gear purchase.
A consistent grind matters more than hitting a perfect number on the dial. Once you find a setting that produces a cup you like, note it and return to it each time.
The V60 Specifically
The Hario V60 has a cone shape and a single large hole at the bottom. Water flow is controlled almost entirely by grind size and pour speed, which makes it less forgiving than a flat-bottom brewer but also more responsive to adjustments.
A few things specific to V60 pour-over technique:
- Use a medium-fine grind, slightly finer than you'd use for a Kalita or Chemex
- Keep your pour speed slow enough that you're not flooding the filter above the coffee bed
- The spiral ribs on the inside of the V60 allow air to escape as water flows; this is intentional design, not a flaw
- A "bypass pour" (adding a small amount of cooler water after brewing) can help if you find the cup too intense
The V60 rewards consistency. A slightly rushed pour on Monday vs. a patient one on Thursday will produce noticeably different results from the same beans. If you want a method that punishes inconsistency less, AeroPress is worth trying as a complement, and French press sits at the opposite end of the spectrum for hands-off brewing.
Common Mistakes
Skipping the rinse. Paper filters have a faint taste. Rinsing takes 10 seconds and eliminates it.
Pouring too fast. Flooding the filter means water channels through the path of least resistance rather than extracting evenly from the whole bed.
Using water that's too hot for dark roasts. Robusta blends or dark-roasted beans can turn harsh quickly at 205°F. Back off to 195°F and you'll often get a cleaner cup.
Not preheating the vessel. Pouring into a cold cup drops the coffee temperature fast. Rinse the cup with the same hot water before you start.
Grinding too far in advance. Ground coffee stales in hours. If you have a grinder, grind right before brewing. Pre-ground from a bag is fine, but once it's open, use it within a week.
Frequently Asked Questions
How long should a pour-over take?
Total brew time from first pour to last drip is usually 3:00–3:30 for a 300 ml cup. The bloom adds about 45 seconds to the front of that. If you're consistently outside that range, adjust your grind before changing anything else.
Can I use pre-ground coffee for pour-over?
Yes. Pre-ground coffee at a medium-fine grind works, and a lot of specialty roasters sell it pre-ground for pour-over specifically. The flavor won't be as fresh as grinding right before brewing, but it's a reasonable starting point if you don't have a grinder yet.
What's the difference between a V60 and a Chemex?
Both are pour-over brewers with a cone-shaped filter. The Chemex uses a thicker proprietary filter that holds back more oils, producing a cleaner, lighter cup. The V60 uses thinner filters and gives you more control over flow rate. The Chemex brews larger volumes (6–10 cups); the V60 is better for one or two.
Do I need a gooseneck kettle?
It helps, but it's not required. A gooseneck lets you pour precisely and slowly, which makes a difference especially with the V60. A regular kettle just needs you to pour carefully. If you're getting into pour-over seriously, a gooseneck is one of the better quality-of-life upgrades you can make.
Why does my pour-over taste bitter?
The most common reasons are grind too fine, water too hot, or brew time too long. Start with grind: coarsen it one step and try again. If bitterness persists with a coarser grind, lower your water temperature to 195°F. If you're brewing dark roasts, both adjustments together often solve it.